Quick Start of Training Library
Prerequisites
Make sure you have installed HyperPose Python Training Library (HowTo).
If your are using commandline tools, make sure you are executing scripts under the root directory of the project (to directly call
train.pyandeval.py).
Model training
The training procedure of HypePose is as simple as 3 configuration steps:
choose the pose algorithm
set the model backbone
select target dataset
1 2 3 4 5 6 7 8 9 10 11 12 13 14 15 16 17 18 | from hyperpose import Config, Model, Dataset
# set model name to distinguish different models
Config.set_model_name("MyLightweightOpenPose")
Config.set_model_type(Config.MODEL.LightweightOpenpose) # set pose algorithm
Config.set_model_backbone(Config.BACKBONE.Vggtiny) # set model backbone
Config.set_dataset_type(Config.DATA.MSCOCO) # set target dataset
# use one GPU for training
Config.set_train_type(Config.TRAIN.Single_train)
# configuration is done, get config object and assemble the system
config = Config.get_config()
model = Model.get_model(config)
dataset = Dataset.get_dataset(config)
Model.get_train(config)(model, dataset) # start training!
|
For each model, HyperPose will save all the related files in the directory:
./save_dir/${MODEL_NAME}, where ${MODEL_NAME} is set in line 4 of above code sample (i.e., “MyLightweightOpenPose”).
The directory regarding training results are listed below:
Folder Name |
Path to what |
|---|---|
|
Model checkpoints |
|
Visualized training samples for debugging. See debugging sample figure. |
|
Visualized evaluation samples for debugging. See debugging sample figure. |
|
Visualized testing samples for debugging. See debugging sample figure. |
|
Visualized annotated dataset samples. See annotated sample figure. |
|
Training logs (e.g., loss). |
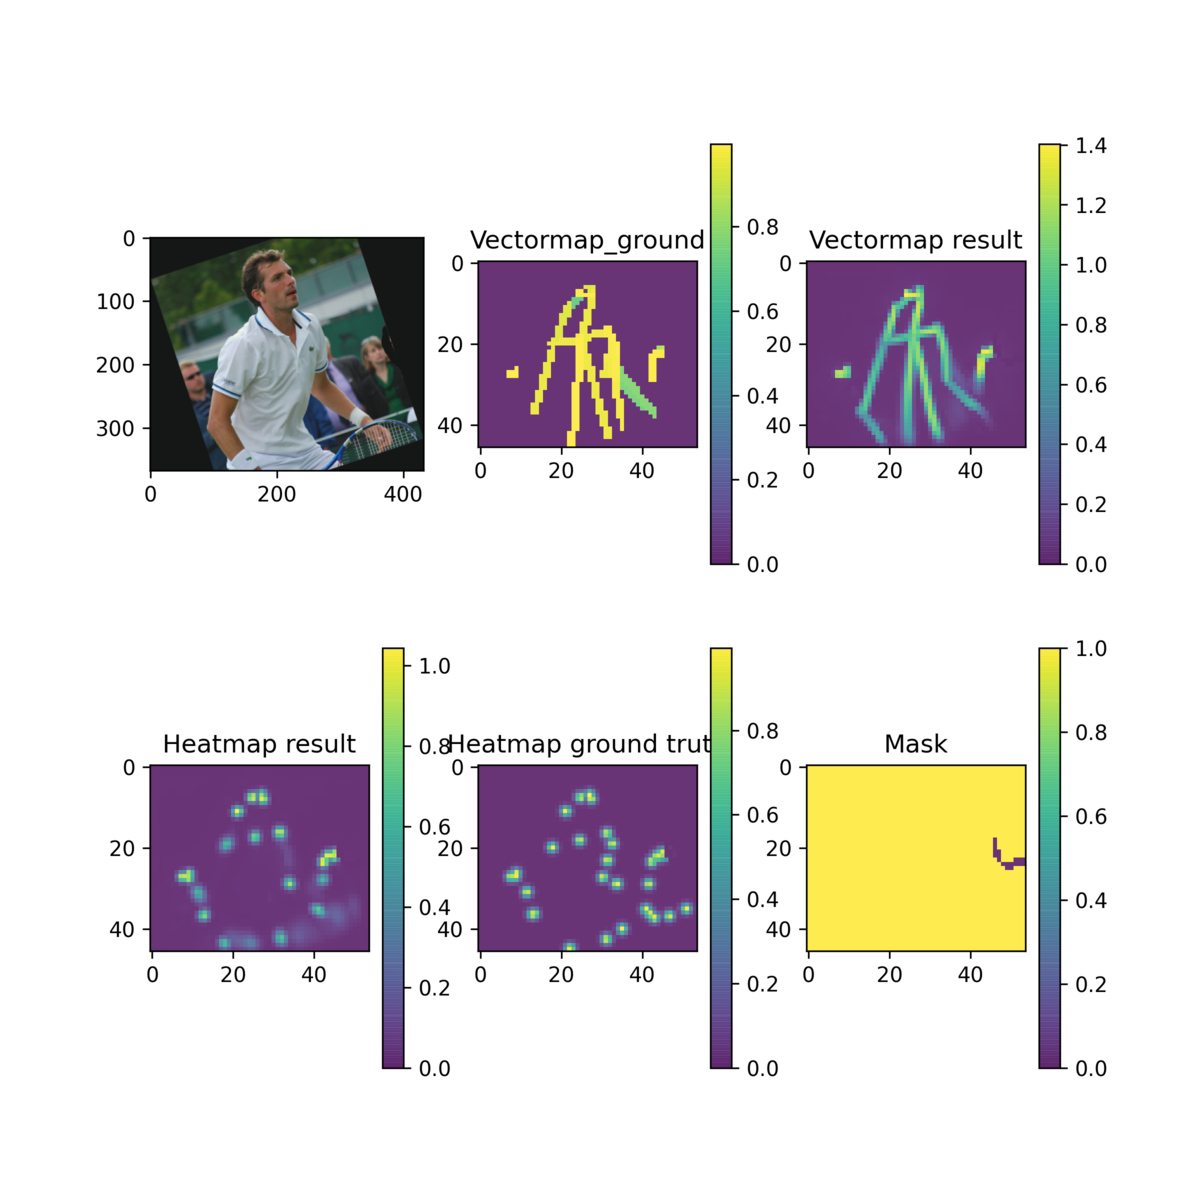
Visualized training/evaluation/testing sample.
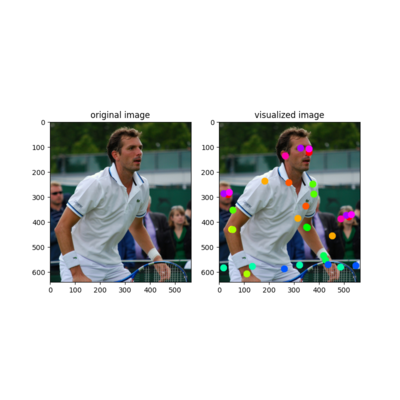
Visualized annotated dataset sample.
We also provide a helpful training commandline tool (train.py) to quickly train pose esitmation models. For detailed usage, please refer to this.
Model evaluation
The evaluate procedure of HyperPose looks quite alike to training one.
Given the model name, model checkpoint will be loaded from ./save_dir/${MODEL_NAME}/model_dir/newest_model.npz.
from hyperpose import Config, Model, Dataset

Config.set_model_name("MyLightweightOpenPose")

Config.set_model_type(Config.MODEL.LightweightOpenpose)  # set pose algorithm
Config.set_model_backbone(Config.BACKBONE.Vggtiny)       # set model backbone
Config.set_dataset_type(Config.DATA.MSCOCO)              # set target dataset

# configuration is done, get config object and assemble the system
config=Config.get_config()
model=Model.get_model(config)
dataset=Dataset.get_dataset(config)

Model.get_eval(config)(model, dataset) # start evaluation!
Then the integrated evaluation pipeline will start, the final evaluate metrics will be output at last.
Note
For the same model name, the algorithm, backbone, and dataset type are expected to be the consistent in training and evaluation.
The evaluation metric follows the official evaluation metric of give dataset.
Like the training commandline tool, we also have one for evaluation (eval.py).
Exporting a model
The trained model weight is saved as a NPZ(.npz) file. For further deployment, the weight from NPZ can be coverted into ONNX format.
To export a model trained by HyperPose, please follow these 2 steps:
Step 1: convert the trained NPZ model into ProtoBuf format
We first use the @tf.function decorator to produce the static computation graph and save it into the ProtoBuf format.
We already provide a script with cli to facilitate conversion, which located at export_pb.py.
After marking the decorators, we can use export_pb.py to start model conversion.
# FLAGS: --model_type=${ALGORITHM_TYPE} --model_name=${MODEL_NAME} --model_backbone={BACKBONE_TYPE}
python export_pb.py --model_name=MyLightweightOpenpose --model_type=LightweightOpenpose --model_backbone=Vggtiny
Then the ProtoBuf model will be stored at ./save_dir/${MODEL_NAME}/frozen_${MODEL_NAME}.pb.
Step 2: convert the frozen ProtoBuf format model into ONNX format
Note
Make sure you have installed the extra dependencies for exporting models according to training installation.
We use tf2onnx library to convert the ProtoBuf format model into ONNX format.
However, to actually convert a model, we need to know its input/output node names.
After running Step 1, we should see output like:
...
Exported graph INPUT nodes: ['x']
Exported graph OUTPUT nodes: ['Identity', 'Identity_1']
In this example, we found the name of input/output nodes, and we need to pass those names as arguments during conversion.
# The input/output names of our example.
export INPUT_NODE_NAME=x
export INPUT_NODE_NAME0=Identity
export INPUT_NODE_NAME1=Identity_1
export OUTPUT_ONNX_MODEL=my_output_model.onnx

python -m tf2onnx.convert --graphdef frozen_${MODEL_NAME}.pb   \
                          --output   ${OUTPUT_ONNX_MODEL}      \
                          --inputs   ${INPUT_NODE_NAME}:0      \
                          --outputs  ${INPUT_NODE_NAME0}:0,${INPUT_NODE_NAME1}:0
We then will see the converted ONNX model named ${OUTPUT_ONNX_MODEL} (‘my_output_model.onnx’ in our example).
Congratulations! now you are able to use the onnx model for Hyperpose prediction library.
Next step
For in-depth usage of HyperPose Training Library, please refer to our training tutorial.